prisma-binding 到 Nexus
概覽
本指南未完全更新,因為它目前使用的是 已棄用 版本的 nexus-plugin-prisma。雖然它仍然可用,但建議今後使用新的 nexus-prisma 庫或替代的程式碼優先 GraphQL 庫,例如 Pothos。如有任何疑問,請加入我們的 Discord。
本升級指南描述瞭如何遷移一個基於 Prisma 1 並使用 prisma-binding 實現 GraphQL 伺服器的 Node.js 專案。
程式碼將遷移到 @nexus/schema 和 nexus-plugin-prisma。與 prisma-binding 使用的 SDL-first 方法不同,Nexus 遵循程式碼優先的方法來構建 GraphQL schema。你可以在這篇文章中瞭解這兩種方法的主要區別。如果你想繼續使用 SDL-first 方法,可以按照指南將 prisma-binding 升級到 SDL-first 設定。
本指南還解釋瞭如何從 JavaScript 遷移到 TypeScript,因此它基本上假設對現有應用程式進行完全重寫。如果你想繼續在 JavaScript 中執行應用程式,可以忽略與 TypeScript 設定相關的說明,並像以前一樣繼續使用 JavaScript。
本指南假設你已經完成了升級 Prisma ORM 層指南。這意味著你已經
- 安裝了 Prisma ORM 2.0 CLI
- 建立了你的 Prisma ORM 2.0 schema
- 內省了你的資料庫並解決了潛在的schema 不相容性
- 安裝並生成了 Prisma Client
本指南還假設你的檔案設定類似於此
.
├── README.md
├── package.json
├── prisma
│   └── schema.prisma
├── prisma1
│   ├── datamodel.prisma
│   └── prisma.yml
└── src
    ├── generated
    │   └── prisma.graphql
    ├── index.js
    └── schema.graphql
重要的部分是
- 一個名為
prisma的資料夾,其中包含你的 Prisma ORM 2.0 schema - 一個名為
src的資料夾,其中包含你的應用程式程式碼和名為schema.graphql的 schema
如果你的專案結構不是這樣的,你需要調整指南中的說明以適應你自己的設定。
1. 安裝和配置 Nexus
1.1. 安裝 Nexus 依賴
第一步是在你的專案中安裝 Nexus 依賴
npm install @nexus/schema
接下來,安裝 Nexus 的 Prisma ORM 外掛,它將允許你在 GraphQL API 中公開 Prisma 模型
npm install nexus-plugin-prisma
nexus-plugin-prisma 依賴項捆綁了所有必需的 Prisma ORM 依賴項。因此,你應該刪除你在升級應用程式的 Prisma ORM 層時安裝的依賴項
npm uninstall @prisma/cli @prisma/client
但請注意,你仍然可以使用熟悉的命令呼叫 Prisma ORM 2.0 CLI
npx prisma
1.2. 配置 TypeScript
由於本指南中你將使用 TypeScript,你需要新增所需的依賴項
npm install typescript ts-node-dev --save-dev
在你的專案根目錄中建立一個名為 tsconfig.json 的新檔案
touch tsconfig.json
現在將以下內容新增到新檔案中
{
  "compilerOptions": {
    "skipLibCheck": true,
    "strict": true,
    "rootDir": "src",
    "noEmit": true
  },
  "include": ["src/**/*"]
}
1.3. 建立你的基本 Nexus 設定
在 src 目錄中建立 API 的根原始檔 index.ts
touch src/index.ts
請注意,在本指南中,你將把整個應用程式寫入 index.ts。實際上,你可能希望將 GraphQL 型別拆分到不同的檔案中,如這個示例所示。
為了進行一些基本設定,將此程式碼新增到 index.ts 中
import { queryType, makeSchema } from '@nexus/schema'
import { nexusSchemaPrisma } from 'nexus-plugin-prisma/schema'
import { GraphQLServer } from 'graphql-yoga'
import { createContext } from './context'

const Query = queryType({
  definition(t) {
    t.string('hello', () => {
      return 'Hello Nexus!'
    })
  },
})

export const schema = makeSchema({
  types: [Query],
  plugins: [nexusSchemaPrisma({ experimentalCRUD: true })],
  outputs: {
    schema: __dirname + '/../schema.graphql',
    typegen: __dirname + '/generated/nexus.ts',
  },
  typegenAutoConfig: {
    contextType: 'Context.Context',
    sources: [
      {
        source: '@prisma/client',
        alias: 'prisma',
      },
      {
        source: require.resolve('./context'),
        alias: 'Context',
      },
    ],
  },
})

new GraphQLServer({ schema, context: createContext() }).start(() =>
  console.log(`Server ready at: https://:4000`)
)
請注意,此設定已包含 Nexus 的 Prisma ORM 外掛配置。這將啟用你將在本指南後面瞭解的 t.model 和 t.crud 功能。
在 typegenAutoConfig 設定中,你正在提供額外的型別,以幫助你的編輯器在你開發應用程式時提供自動補全。目前它引用了一個名為 context.ts 的檔案,但你的專案中還沒有該檔案。此檔案將包含透過 GraphQL 解析器鏈傳遞的 context 物件的型別。
在 src 目錄中建立新的 context.ts 檔案
touch src/context.ts
現在向其中新增以下程式碼
import { PrismaClient } from '@prisma/client'

const prisma = new PrismaClient()

export interface Context {
  prisma: PrismaClient
}

export function createContext(): Context {
  return { prisma }
}
接下來,調整 package.json 中的 scripts 部分,使其包含以下命令
{
  "scripts": {
    "start": "node dist/server",
    "clean": "rm -rf dist",
    "build": "npm -s run clean && npm -s run generate && tsc",
    "generate": "npm -s run generate:prisma && npm -s run generate:nexus",
    "generate:prisma": "prisma generate",
    "generate:nexus": "ts-node --transpile-only src/schema",
    "dev": "ts-node-dev --no-notify --respawn --transpile-only src"
  }
}
dev 指令碼會啟動一個開發伺服器,在你開發應用程式時,你始終應該讓它在後臺執行。這很重要,因為 Nexus 會在後臺執行程式碼生成。
你可以使用以下命令啟動開發伺服器
npm run dev
你應該看到以下 CLI 輸出
Server ready at: https://:4000
你的 GraphQL 伺服器現在正在 https://:4000 執行。到目前為止,它實現了一個 GraphQL 查詢,你可以這樣傳送它
{
  hello
}
在以下步驟中,我們將解釋如何將現有使用 prisma-binding 實現的 SDL-first GraphQL schema 遷移到使用 Nexus 的等效設定。
2. 建立你的 GraphQL 型別
升級過程的下一步是建立你的 GraphQL 型別。在這種情況下,你的 GraphQL 型別將映象 Prisma 模型(這可能與你在 prisma-binding 設定中的情況一樣)。如果 GraphQL 型別與 Prisma 模型有所不同,你將能夠使用 Nexus API 輕鬆地相應調整公開的 GraphQL 型別。
為了本指南的目的,你將把所有程式碼儲存在一個檔案中。但是,你可以根據個人偏好組織檔案並相應地進行 import。
在 Nexus 中,GraphQL 型別透過 objectType 函式定義。匯入 objectType,然後開始構建你的第一個 GraphQL 型別的骨架。在本例中,我們從將 Prisma schema 的 User 模型對映到 GraphQL 開始
import { objectType } from 'nexus'

const User = objectType({
  name: 'User',
  definition(t) {
    // the fields of the type will be defined here
  },
})
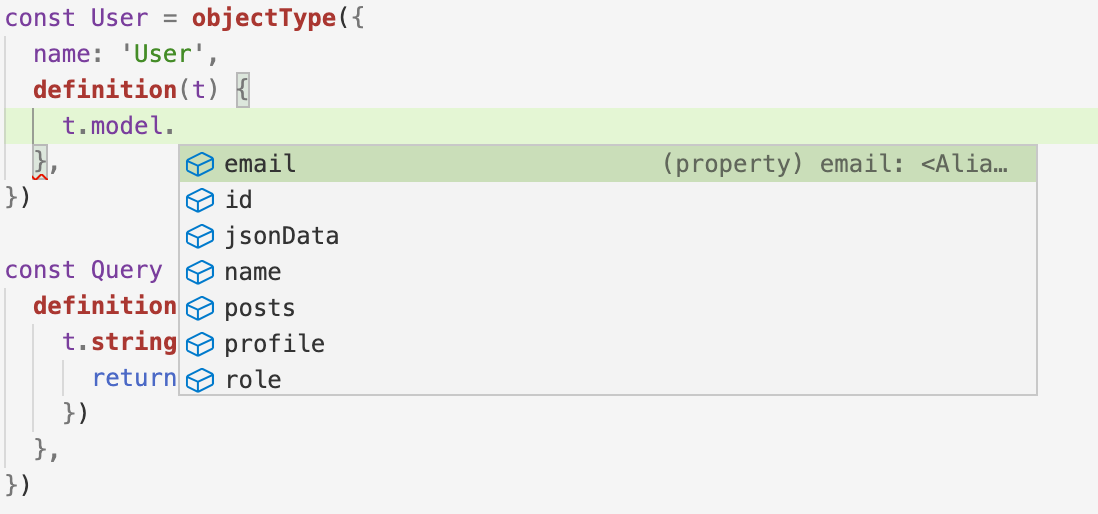
有了這段程式碼,你可以開始逐一公開 User 模型的欄位。你可以使用編輯器的自動補全來節省一些輸入。在 definition 函式的主體中,輸入 t.model.,然後按下 CTRL+SPACE。這將顯示自動補全,並建議 User 模型上定義的所有欄位

請注意,t 上的 model 屬性由 nexus-plugin-prisma 提供。它利用你的 Prisma schema 中的型別資訊,讓你透過 GraphQL 公開你的 Prisma 模型。
透過這種方式,你可以開始完成你的物件型別定義,直到公開模型的所有欄位
const User = objectType({
  name: 'User',
  definition(t) {
    t.model.id()
    t.model.email()
    t.model.name()
    t.model.jsonData()
    t.model.role()
    t.model.profile()
    t.model.posts()
  },
})
此時,任何關係欄位都可能導致 TypeScript 錯誤(在這種情況下,將是 profile 和 posts,它們都指向其他物件型別)。這是預期行為,在你新增剩餘型別後,這些錯誤將自動解決。
注意:請確保你使用
npm run dev啟動的 Nexus 開發伺服器始終在執行。當你儲存檔案時,它會在後臺不斷更新生成的 Nexus 型別,從而啟用自動補全。
請注意,t.model.posts 關係公開了一個 Post 物件的列表。預設情況下,Nexus 只為該列表公開分頁屬性——如果你還想為該關係新增排序和過濾,你需要明確啟用它們
const User = objectType({
  name: 'User',
  definition(t) {
    t.model.id()
    t.model.email()
    t.model.name()
    t.model.jsonData()
    t.model.role()
    t.model.profile()
    t.model.posts({
      filtering: true,
      ordering: true,
    })
  },
})
在使用 objectType 函式定義型別後,你還需要手動將其新增到你使用 Nexus 構建的 GraphQL schema 中。你可以透過將其新增到作為 makeSchema 函式選項提供的 types 中來完成此操作
export const schema = makeSchema({
  types: [Query, User],
  plugins: [nexusSchemaPrisma()],
  outputs: {
    schema: __dirname + '/../schema.graphql',
    typegen: __dirname + '/generated/nexus.ts',
  },
  typegenAutoConfig: {
    sources: [
      {
        source: '@prisma/client',
        alias: 'prisma',
      },
    ],
  },
})
完成第一個型別後,你可以開始定義其餘的型別。
展開以檢視示例資料模型的完整版本
要使用 Nexus 公開所有示例 Prisma 模型,需要以下程式碼
const User = objectType({
  name: 'User',
  definition(t) {
    t.model.id()
    t.model.email()
    t.model.name()
    t.model.jsonData()
    t.model.role()
    t.model.profile()
    t.model.posts({
      filtering: true,
      ordering: true,
    })
  },
})

const Post = objectType({
  name: 'Post',
  definition(t) {
    t.model.id()
    t.model.createdAt()
    t.model.updatedAt()
    t.model.title()
    t.model.content()
    t.model.published()
    t.model.author()
    t.model.authorId()
    t.model.categories({
      filtering: true,
      ordering: true,
    })
  },
})

const Profile = objectType({
  name: 'Profile',
  definition(t) {
    t.model.id()
    t.model.bio()
    t.model.userId()
    t.model.user()
  },
})

const Category = objectType({
  name: 'Category',
  definition(t) {
    t.model.id()
    t.model.name()
    t.model.posts({
      filtering: true,
      ordering: true,
    })
  },
})
請確保將所有新定義的型別包含在提供給 makeSchema 的 types 選項中
export const schema = makeSchema({
  types: [Query, User, Post, Profile, Category],
  plugins: [nexusSchemaPrisma()],
  outputs: {
    schema: __dirname + '/../schema.graphql',
    typegen: __dirname + '/generated/nexus.ts',
  },
  typegenAutoConfig: {
    sources: [
      {
        source: '@prisma/client',
        alias: 'prisma',
      },
    ],
  },
})
你可以在生成的 GraphQL schema 檔案 ./schema.graphql 中檢視你的 GraphQL schema 的當前 SDL 版本。
3. 遷移 GraphQL 操作
下一步,你可以開始將所有 GraphQL 查詢和突變從“舊”GraphQL API 遷移到使用 Nexus 構建的新 API。
對於本指南,將使用以下示例 GraphQL schema
# import Post from './generated/prisma.graphql'
# import User from './generated/prisma.graphql'
# import Category from './generated/prisma.graphql'

input UserUniqueInput {
  id: String
  email: String
}

type Query {
  posts(searchString: String): [Post!]!
  user(userUniqueInput: UserUniqueInput!): User
  users(where: UserWhereInput, orderBy: Enumerable<UserOrderByInput>, skip: Int, after: String, before: String, first: Int, last: Int): [User]!
}

type Mutation {
  createUser(data: UserCreateInput!): User!
  createDraft(title: String!, content: String, authorId: ID!): Post
  updateBio(userUniqueInput: UserUniqueInput!, bio: String!): User
  addPostToCategories(postId: String!, categoryIds: [String!]!): Post
}
3.1. 遷移 GraphQL 查詢
在本節中,你將把所有 GraphQL 查詢從 prisma-binding 遷移到 Nexus。
3.1.1. 遷移 users 查詢(使用 forwardTo)
在我們的示例 API 中,示例 GraphQL schema 中的 users 查詢定義和實現如下。
使用 prisma-binding 的 SDL schema 定義
type Query {
  users(where: UserWhereInput, orderBy: Enumerable<UserOrderByInput>, skip: Int, after: String, before: String, first: Int, last: Int): [User]!
  # ... other queries
}
使用 prisma-binding 的解析器實現
const resolvers = {
  Query: {
    users: forwardTo('prisma'),
    // ... other resolvers
  },
}
為了在 Nexus 中映象相同的行為,你可以在 definition 函式內部的 t 變數上使用 crud 屬性。
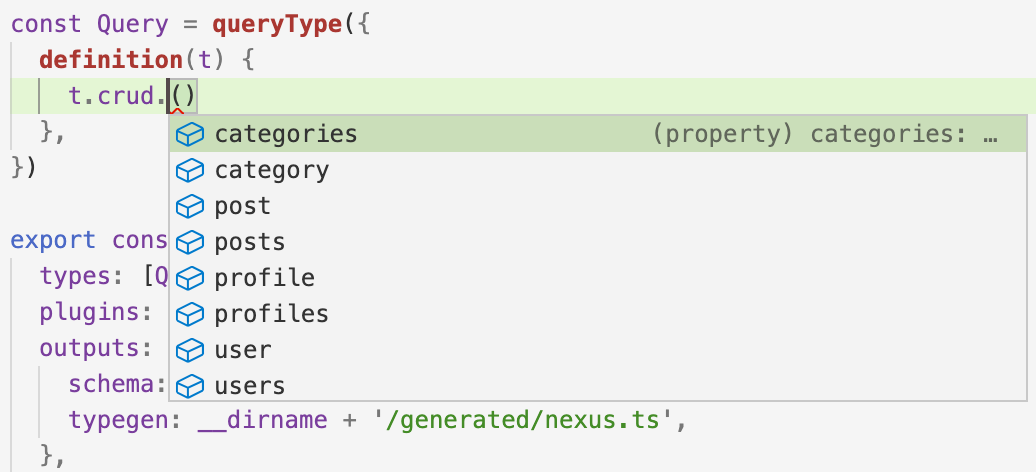
與 model 類似,此屬性可用是因為你正在使用 nexus-prisma-plugin,它利用你的 Prisma 模型中的型別資訊並在底層自動生成解析器。crud 屬性也支援自動補全,因此你可以在編輯器中再次探索所有可用的查詢

使用 nexus-prisma-plugin 轉發查詢
要將 users 查詢新增到你的 GraphQL API 中,請將以下行新增到查詢型別定義中
const Query = queryType({
  definition(t) {
    t.crud.users({
      filtering: true,
      ordering: true,
    })
  },
})
如果你的 Nexus 開發伺服器正在執行,你可以儲存檔案,你的 GraphQL API 將更新以公開新的 users 查詢。你還可以透過檢視生成的 schema.graphql 檔案中的 Query 型別來觀察這一點
type Query {
  users(after: UserWhereUniqueInput, before: UserWhereUniqueInput, first: Int, last: Int, orderBy: Enumerable<UserOrderByInput>, skip: Int, where: UserWhereInput): [User!]!
}
你現在可以針對新的 API 編寫你的第一個查詢,例如
{
  users {
    id
    name
    profile {
      id
      bio
    }
    posts {
      id
      title
      categories {
        id
        name
      }
    }
  }
}
如果你的應用程式使用 forwardTo 公開了 Prisma ORM 的所有 CRUD 操作,你現在可以透過 t.crud 使用相同的方法繼續新增所有剩餘的操作。要了解如何使用 Nexus 定義和解析“自定義”查詢,請轉到下一節。
3.1.2. 遷移 posts(searchString: String): [Post!]! 查詢
posts 查詢的定義和實現如下。
使用 prisma-binding 的 SDL schema 定義
type Query {
  posts(searchString: String): [Post!]!
  # ... other queries
}
使用 prisma-binding 的解析器實現
const resolvers = {
  Query: {
    posts: (_, args, context, info) => {
      return context.prisma.query.posts(
        {
          where: {
            OR: [
              { title_contains: args.searchString },
              { content_contains: args.searchString },
            ],
          },
        },
        info
      )
    },
    // ... other resolvers
  },
}
使用 nexus 的程式碼優先 schema 定義
為了在 Nexus 中獲得相同的行為,你需要在 queryType 中新增一個 t.field 定義
const Query = queryType({
  definition(t) {
    // ... previous queries

    t.list.field('posts', {
      type: 'Post',
      nullable: false,
      args: { searchString: stringArg() },
    })
  },
})
雖然這段程式碼可能在你的編輯器中會顯示型別錯誤,但你已經可以在 schema.graphql 中檢視你的 GraphQL schema 的生成的 SDL 版本。你會注意到這已經為你的 GraphQL schema 添加了正確的定義
type Query {
  posts(searchString: String): [Post!]!
  users(after: UserWhereUniqueInput, before: UserWhereUniqueInput, first: Int, last: Int, orderBy: Enumerable<UserOrderByInput>, skip: Int, where: UserWhereInput): [User!]!
}
但是,程式碼缺少實際的解析器邏輯。這是你接下來要新增的內容。
使用 nexus 的解析器實現
你可以按如下方式使用 Nexus 新增解析器
const Query = queryType({
  definition(t) {
    // ... previous queries

    t.list.field('posts', {
      type: 'Post',
      nullable: false,
      args: { searchString: stringArg() },
      resolve: (_, args, context) => {
        return context.prisma.post.findMany({
          where: {
            OR: [
              {
                title: { contains: args.searchString },
              },
              {
                content: { contains: args.searchString },
              },
            ],
          },
        })
      },
    })
  },
})
為了驗證實現,你現在可以例如向你的 GraphQL 伺服器傳送以下示例查詢
{
  posts {
    id
    title
    author {
      id
      name
    }
  }
}
3.1.2. 遷移 user(uniqueInput: UserUniqueInput): User 查詢
在我們的示例應用程式中,user 查詢的定義和實現如下。
使用 prisma-binding 的 SDL schema 定義
type Query {
  user(userUniqueInput: UserUniqueInput): User
  # ... other queries
}

input UserUniqueInput {
  id: String
  email: String
}
請注意,這是一個有點刻意設計的例子,旨在演示在 Nexus 中使用 input 型別。
使用 prisma-binding 的解析器實現
const resolvers = {
  Query: {
    user: (_, args, context, info) => {
      return context.prisma.query.user(
        {
          where: args.userUniqueInput,
        },
        info
      )
    },
    // ... other resolvers
  },
}
使用 nexus 的程式碼優先 schema 定義
為了在 Nexus 中獲得相同的行為,你需要在 queryType 中新增一個 t.field 定義,並定義一個包含 User 模型兩個 @unique 欄位的 inputObjectType
import { inputObjectType, arg } from '@nexus/schema'

const UserUniqueInput = inputObjectType({
  name: 'UserUniqueInput',
  definition(t) {
    t.string('id')
    t.string('email')
  },
})

const Query = queryType({
  definition(t) {
    // ... previous queries

    t.field('user', {
      type: 'User',
      args: {
        userUniqueInput: arg({
          type: 'UserUniqueInput',
          nullable: false,
        }),
      },
    })
  },
})
由於 UserUniqueInput 是你的 GraphQL schema 中的一個新型別,你需要再次將其新增到傳遞給 makeSchema 的 types 選項中
export const schema = makeSchema({
  types: [Query, User, Post, Profile, Category, UserUniqueInput],
  plugins: [nexusSchemaPrisma()],
  outputs: {
    schema: __dirname + '/../schema.graphql',
    typegen: __dirname + '/generated/nexus.ts',
  },
  typegenAutoConfig: {
    sources: [
      {
        source: '@prisma/client',
        alias: 'prisma',
      },
    ],
  },
})
如果你檢視 schema.graphql 中生成的 GraphQL schema 的 SDL 版本,你會注意到此更改已為你的 GraphQL schema 添加了正確的定義
type Query {
  posts(searchString: String): [Post!]
  user(userUniqueInput: UserUniqueInput!): User
  users(after: UserWhereUniqueInput, before: UserWhereUniqueInput, first: Int, last: Int, orderBy: Enumerable<UserOrderByInput>, skip: Int, where: UserWhereInput): [User!]!
}

input UserUniqueInput {
  email: String
  id: String
}
你甚至可以透過 GraphQL Playground 傳送相應的查詢了
{
  user(userUniqueInput: { email: "alice@prisma.io" }) {
    id
    name
  }
}
但是,由於解析器尚未實現,你目前不會獲得任何資料。
使用 nexus 的程式碼優先解析器實現
你可以按如下方式使用 Nexus 新增解析器
const UserUniqueInput = inputObjectType({
  name: 'UserUniqueInput',
  definition(t) {
    t.string('id')
    t.string('email')
  },
})

const Query = queryType({
  definition(t) {
    // ... previous queries

    t.field('user', {
      type: 'User',
      nullable: true,
      args: {
        userUniqueInput: arg({
          type: 'UserUniqueInput',
          nullable: false,
        }),
      },
      resolve: (_, args, context) => {
        return context.prisma.user.findUnique({
          where: {
            id: args.userUniqueInput?.id,
            email: args.userUniqueInput?.email,
          },
        })
      },
    })
  },
})
如果你重新發送之前的相同查詢,你會發現它現在返回實際資料了。
3.2. 遷移 GraphQL 突變
在本節中,你將把 GraphQL 突變從示例 schema 遷移到 Nexus。
3.2.1. 定義 Mutation 型別
遷移任何突變的第一步是定義你的 GraphQL API 的 Mutation 型別。完成後,你可以逐步向其中新增操作。將以下定義新增到 index.ts 中
import { mutationType } from '@nexus/schema'

const Mutation = mutationType({
  definition(t) {
    // your GraphQL mutations + resolvers will be defined here
  },
})
為了確保 Nexus 識別新的 Mutation 型別,你需要將其新增到提供給 makeSchema 的 types 中
export const schema = makeSchema({
  types: [Query, User, Post, Profile, Category, UserUniqueInput, Mutation],
  plugins: [nexusSchemaPrisma()],
  outputs: {
    schema: __dirname + '/../schema.graphql',
    typegen: __dirname + '/generated/nexus.ts',
  },
  typegenAutoConfig: {
    sources: [
      {
        source: '@prisma/client',
        alias: 'prisma',
      },
    ],
  },
})
3.2.2. 遷移 createUser 突變(使用 forwardTo)
在示例應用程式中,示例 GraphQL schema 中的 createUser 突變定義和實現如下。
使用 prisma-binding 的 SDL schema 定義
type Mutation {
  createUser(data: UserCreateInput!): User!
  # ... other mutations
}
使用 prisma-binding 的解析器實現
const resolvers = {
  Mutation: {
    createUser: forwardTo('prisma'),
    // ... other resolvers
  },
}
與轉發 GraphQL 查詢類似,你可以在 definition 函式內部的 t 變數上使用 crud 屬性,以公開 Prisma 模型的完整 CRUD 功能。
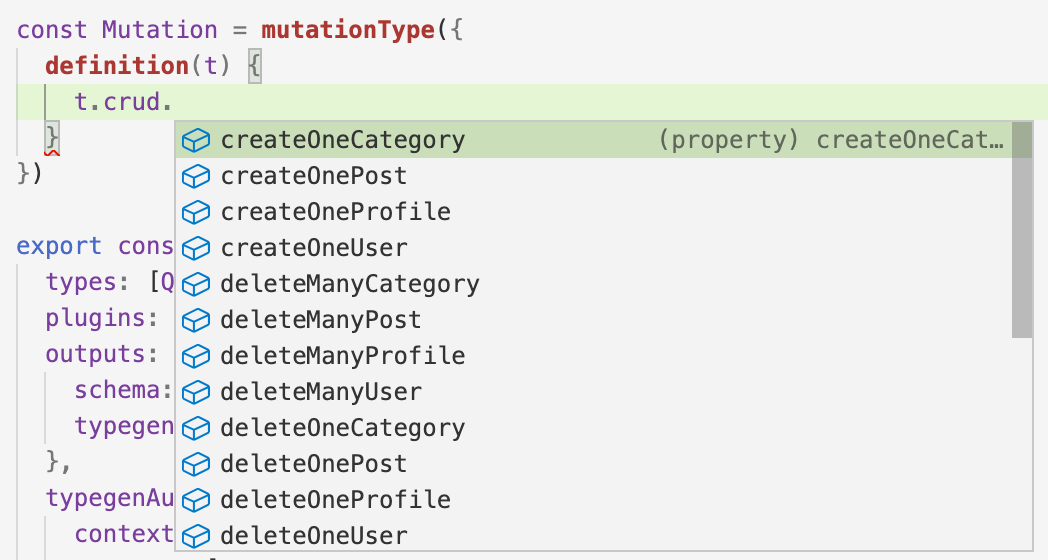
與 model 類似,此屬性可用是因為你正在使用 nexus-prisma-plugin,它利用你的 Prisma 模型中的型別資訊並在底層自動生成解析器。crud 屬性在定義突變時也支援自動補全,因此你可以在編輯器中再次探索所有可用操作

使用 nexus-prisma-plugin 轉發突變
要將 createUser 突變新增到你的 GraphQL API 中,請將以下行新增到查詢型別定義中
const Mutation = mutationType({
  definition(t) {
    t.crud.createOneUser({
      alias: 'createUser',
    })
  },
})
請注意,你的 GraphQL schema 中突變的預設名稱是 createOneUser(以 t.crud 公開的函式命名)。為了將其重新命名為 createUser,你需要提供 alias 屬性。
如果你的 Nexus 開發伺服器正在執行,你可以儲存檔案,你的 GraphQL API 將更新以公開新的 createUser 突變。你還可以透過檢視生成的 schema.graphql 檔案中的 Mutation 型別來觀察這一點
type Mutation {
  createUser(data: UserCreateInput!): User!
}
你現在可以針對新的 API 編寫你的第一個突變,例如
mutation {
  createUser(data: { name: "Alice", email: "alice@prisma.io" }) {
    id
  }
}
如果你的應用程式使用 forwardTo 公開了 Prisma Client 的所有 CRUD 操作,你現在可以透過 t.crud 使用相同的方法繼續新增所有剩餘的操作。要了解如何使用 Nexus 定義和解析“自定義”突變,請轉到下一節。
3.2.3. 遷移 createDraft(title: String!, content: String, authorId: String!): Post! 查詢
在示例應用程式中,createDraft 突變定義和實現如下。
使用 prisma-binding 的 SDL schema 定義
type Mutation {
  createDraft(title: String!, content: String, authorId: String!): Post!
  # ... other mutations
}
使用 prisma-binding 的解析器實現
const resolvers = {
  Mutation: {
    createDraft: (_, args, context, info) => {
      return context.prisma.mutation.createPost(
        {
          data: {
            title: args.title,
            content: args.content,
            author: {
              connect: {
                id: args.authorId,
              },
            },
          },
        },
        info
      )
    },
    // ... other resolvers
  },
}
使用 nexus 的程式碼優先 schema 定義
為了在 Nexus 中獲得相同的行為,你需要在 mutationType 中新增一個 t.field 定義
const Mutation = mutationType({
  definition(t) {
    // ... previous mutations

    t.field('createDraft', {
      type: 'Post',
      args: {
        title: stringArg({ nullable: false }),
        content: stringArg(),
        authorId: stringArg({ nullable: false }),
      },
    })
  },
})
如果你檢視 schema.graphql 中生成的 GraphQL schema 的 SDL 版本,你會注意到此更改已為你的 GraphQL schema 添加了正確的定義
type Mutation {
  createUser(data: UserCreateInput!): User!
  createDraft(title: String!, content: String, authorId: String!): Post!
}
你甚至可以透過 GraphQL Playground 傳送相應的突變了
mutation {
  createDraft(title: "Hello World", authorId: "__AUTHOR_ID__") {
    id
    published
    author {
      id
      name
    }
  }
}
但是,由於解析器尚未實現,因此不會建立新的 Post 記錄,並且你將不會在響應中獲得任何資料。
使用 nexus 的解析器實現
那是因為你仍然缺少該突變的解析器實現。你可以按如下方式使用 Nexus 新增解析器
const Mutation = mutationType({
  definition(t) {
    // ... previous mutations

    t.field('createDraft', {
      type: 'Post',
      args: {
        title: stringArg({ nullable: false }),
        content: stringArg(),
        authorId: stringArg({ nullable: false }),
      },
      resolve: (_, args, context) => {
        return context.prisma.post.create({
          data: {
            title: args.title,
            content: args.content,
            author: {
              connect: { id: args.authorId },
            },
          },
        })
      },
    })
  },
})
如果你重新發送之前的相同查詢,你會發現它現在會建立一個新的 Post 記錄並返回有效資料。
3.2.4. 遷移 updateBio(bio: String, userUniqueInput: UserUniqueInput!): User 突變
在示例應用程式中,updateBio 突變定義和實現如下。
使用 prisma-binding 的 SDL schema 定義
type Mutation {
  updateBio(bio: String!, userUniqueInput: UserUniqueInput!): User
  # ... other mutations
}
使用 prisma-binding 的解析器實現
const resolvers = {
  Mutation: {
    updateBio: (_, args, context, info) => {
      return context.prisma.mutation.updateUser(
        {
          data: {
            profile: {
              update: { bio: args.bio },
            },
          },
          where: { id: args.userId },
        },
        info
      )
    },
    // ... other resolvers
  },
}
使用 nexus 的程式碼優先 schema 定義
為了在 Nexus 中獲得相同的行為,你需要在 mutationType 中新增一個 t.field 定義
const Mutation = mutationType({
  definition(t) {
    // ... previous mutations

    t.field('updateBio', {
      type: 'User',
      args: {
        userUniqueInput: arg({
          type: 'UserUniqueInput',
          nullable: false,
        }),
        bio: stringArg({ nullable: false }),
      },
    })
  },
})
如果你檢視 schema.graphql 中生成的 GraphQL schema 的 SDL 版本,你會注意到此更改已為你的 GraphQL schema 添加了正確的定義
type Mutation {
  createUser(data: UserCreateInput!): User!
  createDraft(title: String!, content: String, authorId: String!): Post!
  updateBio(bio: String!, userUniqueInput: UserUniqueInput!): User
}
你甚至可以透過 GraphQL Playground 傳送相應的突變了
mutation {
  updateBio(
    userUniqueInput: { email: "alice@prisma.io" }
    bio: "I like turtles"
  ) {
    id
    name
    profile {
      id
      bio
    }
  }
}
但是,由於解析器尚未實現,資料庫中不會有任何更新,並且你將不會在響應中獲得任何資料。
使用 nexus 的解析器實現
你可以按如下方式使用 Nexus 新增解析器
const Mutation = mutationType({
  definition(t) {
    // ... previous mutations

    t.field('updateBio', {
      type: 'User',
      args: {
        userUniqueInput: arg({
          type: 'UserUniqueInput',
          nullable: false
        }),
        bio: stringArg()
      },
      resolve: (_, args, context) => {
        return context.prisma.user.update({
          where: {
            id: args.userUniqueInput?.id,
            email: args.userUniqueInput?.email
          },
          data: {
            profile: {
              create: { bio: args.bio }
            }
          }
        })
      }
    }
  }
})
如果你重新發送之前的相同查詢,你會發現它現在返回實際資料而不是 null。
3.2.5. 遷移 addPostToCategories(postId: String!, categoryIds: [String!]!): Post 突變
在我們的示例應用程式中,addPostToCategories 突變定義和實現如下。
使用 prisma-binding 的 SDL schema 定義
type Mutation {
  addPostToCategories(postId: String!, categoryIds: [String!]!): Post
  # ... other mutations
}
使用 prisma-binding 的解析器實現
const resolvers = {
  Mutation: {
    addPostToCategories: (_, args, context, info) => {
      const ids = args.categoryIds.map((id) => ({ id }))
      return context.prisma.mutation.updatePost(
        {
          data: {
            categories: {
              connect: ids,
            },
          },
          where: {
            id: args.postId,
          },
        },
        info
      )
    },
    // ... other resolvers
  },
}
使用 nexus 的程式碼優先 schema 定義
為了在 Nexus 中獲得相同的行為,你需要在 mutationType 中新增一個 t.field 定義
const Mutation = mutationType({
  definition(t) {
    // ... mutations from before

    t.field('addPostToCategories', {
      type: 'Post',
      args: {
        postId: stringArg({ nullable: false }),
        categoryIds: stringArg({
          list: true,
          nullable: false,
        }),
      },
    })
  },
})
如果你檢視 schema.graphql 中生成的 GraphQL schema 的 SDL 版本,你會注意到此更改已為你的 GraphQL schema 添加了正確的定義
type Mutation {
  createUser(data: UserCreateInput!): User!
  createDraft(title: String!, content: String, authorId: String!): Post!
  updateBio(bio: String, userUniqueInput: UserUniqueInput!): User
  addPostToCategories(postId: String!, categoryIds: [String!]!): Post
}
你甚至可以透過 GraphQL Playground 傳送相應的查詢了
mutation {
  addPostToCategories(
    postId: "__AUTHOR_ID__"
    categoryIds: ["__CATEGORY_ID_1__", "__CATEGORY_ID_2__"]
  ) {
    id
    title
    categories {
      id
      name
    }
  }
}
但是,由於解析器尚未實現,資料庫中不會有任何更新,並且你將不會在響應中獲得任何資料。
使用 nexus 的解析器實現
你可以按如下方式使用 Nexus 新增解析器
const Mutation = mutationType({
  definition(t) {
    // ... mutations from before
    t.field('addPostToCategories', {
      type: 'Post',
      args: {
        postId: stringArg({ nullable: false }),
        categoryIds: stringArg({
          list: true,
          nullable: false,
        }),
      },
      resolve: (_, args, context) => {
        const ids = args.categoryIds.map((id) => ({ id }))
        return context.prisma.post.update({
          where: {
            id: args.postId,
          },
          data: {
            categories: { connect: ids },
          },
        })
      },
    })
  },
})
如果你重新發送之前的相同查詢,你會發現它現在返回實際資料而不是 null。
4. 清理
由於整個應用程式現在已升級到 Prisma ORM 2.0 和 Nexus,你可以刪除所有不必要的檔案並移除不再需要的依賴項。
4.1. 清理 npm 依賴項
你可以首先移除與 Prisma 1 設定相關的 npm 依賴項
npm uninstall graphql-cli prisma-binding prisma1
4.2. 刪除未使用的檔案
接下來,刪除你的 Prisma 1 設定檔案
rm prisma1/datamodel.prisma prisma1/prisma.yml
你還可以刪除任何剩餘的 .js 檔案、舊的 schema.graphql 和 prisma.graphql 檔案。
4.3. 停止 Prisma ORM 伺服器
最後,你可以停止執行你的 Prisma ORM 伺服器。