從 prisma-binding 到 SDL-first
概覽
本升級指南描述瞭如何遷移一個基於 Prisma 1 並使用 prisma-binding 實現 GraphQL 伺服器的 Node.js 專案。
程式碼將保留 SDL-first 方法 來構建 GraphQL schema。從 prisma-binding 遷移到 Prisma Client 時,主要區別在於 info 物件不能再用於自動解析關係,相反,你需要實現自己的 type resolvers 以確保關係得到正確解析。
本指南假設你已經完成了 升級 Prisma ORM 層的指南。這意味著你已經
- 安裝了 Prisma ORM 2 CLI
- 建立了你的 Prisma ORM 2 schema
- 內省了你的資料庫並解決了潛在的 schema 不相容性
- 安裝並生成了 Prisma Client
本指南進一步假設你的檔案設定類似於此
.
├── README.md
├── package.json
├── prisma
│   └── schema.prisma
├── prisma1
│   ├── datamodel.prisma
│   └── prisma.yml
└── src
    ├── generated
    │   └── prisma.graphql
    ├── index.js
    └── schema.graphql
重要部分包括
- 一個名為
prisma的資料夾,其中包含你的 Prisma ORM 2 schema - 一個名為
src的資料夾,其中包含你的應用程式程式碼和一個名為schema.graphql的 schema
如果你的專案結構不是這樣,你需要根據你自己的設定調整指南中的說明。
1. 調整你的 GraphQL schema
使用 prisma-binding,你定義 GraphQL schema(有時稱為 應用程式 schema)的方法是基於從生成的 prisma.graphql 檔案中匯入 GraphQL 型別(在 Prisma 1 中,這通常被稱為 Prisma GraphQL schema)。這些型別反映了你的 Prisma 1 資料模型中的型別,並作為你的 GraphQL API 的基礎。
使用 Prisma ORM 2,不再有你可以匯入的 prisma.graphql 檔案。因此,你必須直接在你的 schema.graphql 檔案中詳細定義你的 GraphQL schema 的所有型別。
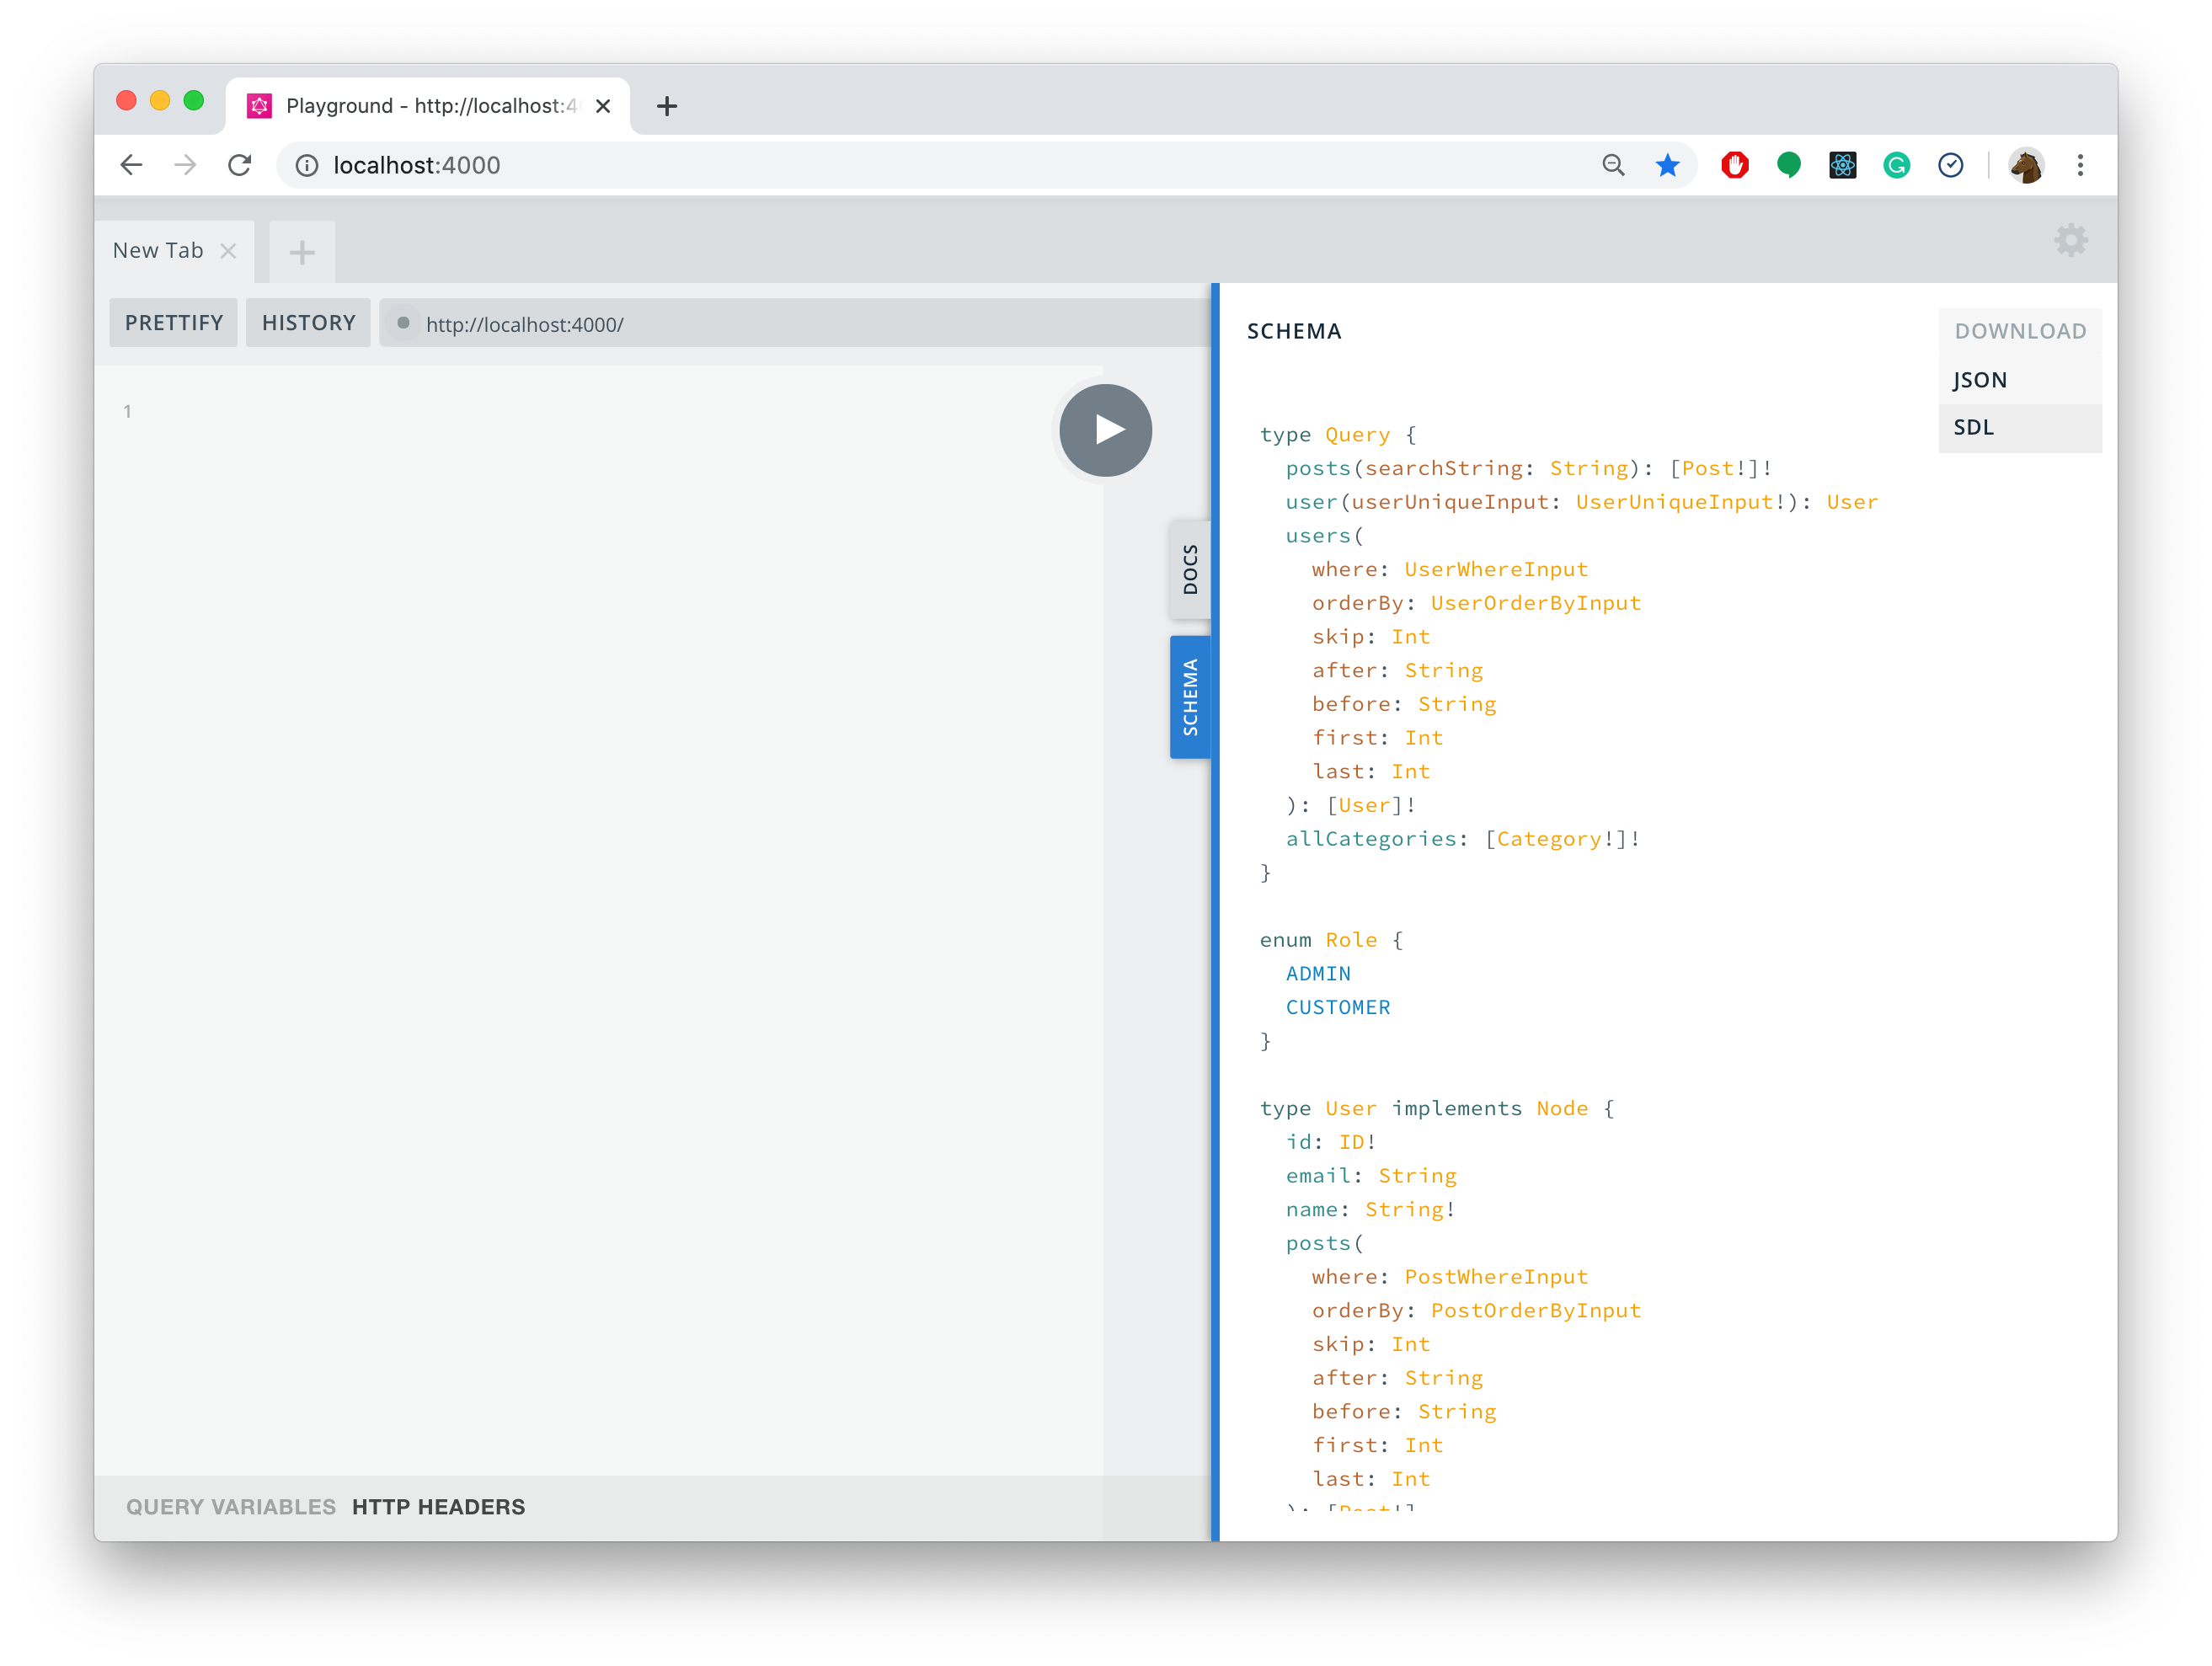
最簡單的方法是從 GraphQL Playground 下載完整的 GraphQL schema。為此,開啟 SCHEMA 選項卡,然後點選右上角的 DOWNLOAD 按鈕,接著選擇 SDL
或者,你可以使用 GraphQL CLI 的 get-schema 命令來下載你的完整 schema
npx graphql get-schema --endpoint __GRAPHQL_YOGA_ENDPOINT__ --output schema.graphql --no-all
注意:使用上述命令時,你需要將
__GRAPHQL_YOGA_ENDPOINT__佔位符替換為你的 GraphQL Yoga 伺服器的實際端點。
獲取 schema.graphql 檔案後,用新內容替換 src/schema.graphql 中的當前版本。請注意,這兩個 schema 是 100% 等效的,只是新版本不再使用 graphql-import 來從不同檔案匯入型別。相反,它在一個檔案中詳細定義了所有型別。
以下是本指南中我們將遷移的兩個版本的示例 GraphQL schema 的比較(你可以使用選項卡在兩個版本之間切換)
- 之前(使用 graphql-import)
- 之後(使用 Prisma 2)
# import Post from './generated/prisma.graphql'
# import User from './generated/prisma.graphql'
# import Category from './generated/prisma.graphql'

type Query {
  posts(searchString: String): [Post!]!
  user(userUniqueInput: UserUniqueInput!): User
  users(where: UserWhereInput, orderBy: Enumerable<UserOrderByInput>, skip: Int, after: String, before: String, first: Int, last: Int): [User]!
  allCategories: [Category!]!
}

input UserUniqueInput {
  id: String
  email: String
}

type Mutation {
  createDraft(authorId: ID!, title: String!, content: String!): Post
  publish(id: ID!): Post
  deletePost(id: ID!): Post
  signup(name: String!, email: String!): User!
  updateBio(userId: String!, bio: String!): User
  addPostToCategories(postId: String!, categoryIds: [String!]!): Post
}
type Query {
  posts(searchString: String): [Post!]!
  user(id: ID!): User
  users(where: UserWhereInput, orderBy: Enumerable<UserOrderByInput>, skip: Int, after: String, before: String, first: Int, last: Int): [User]!
  allCategories: [Category!]!
}

type Category implements Node {
  id: ID!
  name: String!
  posts(where: PostWhereInput, orderBy: Enumerable<PostOrderByInput>, skip: Int, after: String, before: String, first: Int, last: Int): [Post!]
}

input CategoryCreateManyWithoutPostsInput {
  create: [CategoryCreateWithoutPostsInput!]
  connect: [CategoryWhereUniqueInput!]
}

input CategoryCreateWithoutPostsInput {
  id: ID
  name: String!
}

enum CategoryOrderByInput {
  id_ASC
  id_DESC
  name_ASC
  name_DESC
}

input CategoryWhereInput {
  """Logical AND on all given filters."""
  AND: [CategoryWhereInput!]

  """Logical OR on all given filters."""
  OR: [CategoryWhereInput!]

  """Logical NOT on all given filters combined by AND."""
  NOT: [CategoryWhereInput!]
  id: ID

  """All values that are not equal to given value."""
  id_not: ID

  """All values that are contained in given list."""
  id_in: [ID!]

  """All values that are not contained in given list."""
  id_not_in: [ID!]

  """All values less than the given value."""
  id_lt: ID

  """All values less than or equal the given value."""
  id_lte: ID

  """All values greater than the given value."""
  id_gt: ID

  """All values greater than or equal the given value."""
  id_gte: ID

  """All values containing the given string."""
  id_contains: ID

  """All values not containing the given string."""
  id_not_contains: ID

  """All values starting with the given string."""
  id_starts_with: ID

  """All values not starting with the given string."""
  id_not_starts_with: ID

  """All values ending with the given string."""
  id_ends_with: ID

  """All values not ending with the given string."""
  id_not_ends_with: ID
  name: String

  """All values that are not equal to given value."""
  name_not: String

  """All values that are contained in given list."""
  name_in: [String!]

  """All values that are not contained in given list."""
  name_not_in: [String!]

  """All values less than the given value."""
  name_lt: String

  """All values less than or equal the given value."""
  name_lte: String

  """All values greater than the given value."""
  name_gt: String

  """All values greater than or equal the given value."""
  name_gte: String

  """All values containing the given string."""
  name_contains: String

  """All values not containing the given string."""
  name_not_contains: String

  """All values starting with the given string."""
  name_starts_with: String

  """All values not starting with the given string."""
  name_not_starts_with: String

  """All values ending with the given string."""
  name_ends_with: String

  """All values not ending with the given string."""
  name_not_ends_with: String
  posts_every: PostWhereInput
  posts_some: PostWhereInput
  posts_none: PostWhereInput
}

input CategoryWhereUniqueInput {
  id: ID
}

scalar DateTime

"""Raw JSON value"""
scalar Json

"""An object with an ID"""
interface Node {
  """The id of the object."""
  id: ID!
}

type Post implements Node {
  id: ID!
  createdAt: DateTime!
  updatedAt: DateTime!
  title: String!
  content: String
  published: Boolean!
  author: User
  categories(where: CategoryWhereInput, orderBy: Enumerable<CategoryOrderByInput>, skip: Int, after: String, before: String, first: Int, last: Int): [Category!]
}

input PostCreateManyWithoutAuthorInput {
  create: [PostCreateWithoutAuthorInput!]
  connect: [PostWhereUniqueInput!]
}

input PostCreateWithoutAuthorInput {
  id: ID
  title: String!
  content: String
  published: Boolean
  categories: CategoryCreateManyWithoutPostsInput
}

enum PostOrderByInput {
  id_ASC
  id_DESC
  createdAt_ASC
  createdAt_DESC
  updatedAt_ASC
  updatedAt_DESC
  title_ASC
  title_DESC
  content_ASC
  content_DESC
  published_ASC
  published_DESC
}

input PostWhereInput {
  """Logical AND on all given filters."""
  AND: [PostWhereInput!]

  """Logical OR on all given filters."""
  OR: [PostWhereInput!]

  """Logical NOT on all given filters combined by AND."""
  NOT: [PostWhereInput!]
  id: ID

  """All values that are not equal to given value."""
  id_not: ID

  """All values that are contained in given list."""
  id_in: [ID!]

  """All values that are not contained in given list."""
  id_not_in: [ID!]

  """All values less than the given value."""
  id_lt: ID

  """All values less than or equal the given value."""
  id_lte: ID

  """All values greater than the given value."""
  id_gt: ID

  """All values greater than or equal the given value."""
  id_gte: ID

  """All values containing the given string."""
  id_contains: ID

  """All values not containing the given string."""
  id_not_contains: ID

  """All values starting with the given string."""
  id_starts_with: ID

  """All values not starting with the given string."""
  id_not_starts_with: ID

  """All values ending with the given string."""
  id_ends_with: ID

  """All values not ending with the given string."""
  id_not_ends_with: ID
  createdAt: DateTime

  """All values that are not equal to given value."""
  createdAt_not: DateTime

  """All values that are contained in given list."""
  createdAt_in: [DateTime!]

  """All values that are not contained in given list."""
  createdAt_not_in: [DateTime!]

  """All values less than the given value."""
  createdAt_lt: DateTime

  """All values less than or equal the given value."""
  createdAt_lte: DateTime

  """All values greater than the given value."""
  createdAt_gt: DateTime

  """All values greater than or equal the given value."""
  createdAt_gte: DateTime
  updatedAt: DateTime

  """All values that are not equal to given value."""
  updatedAt_not: DateTime

  """All values that are contained in given list."""
  updatedAt_in: [DateTime!]

  """All values that are not contained in given list."""
  updatedAt_not_in: [DateTime!]

  """All values less than the given value."""
  updatedAt_lt: DateTime

  """All values less than or equal the given value."""
  updatedAt_lte: DateTime

  """All values greater than the given value."""
  updatedAt_gt: DateTime

  """All values greater than or equal the given value."""
  updatedAt_gte: DateTime
  title: String

  """All values that are not equal to given value."""
  title_not: String

  """All values that are contained in given list."""
  title_in: [String!]

  """All values that are not contained in given list."""
  title_not_in: [String!]

  """All values less than the given value."""
  title_lt: String

  """All values less than or equal the given value."""
  title_lte: String

  """All values greater than the given value."""
  title_gt: String

  """All values greater than or equal the given value."""
  title_gte: String

  """All values containing the given string."""
  title_contains: String

  """All values not containing the given string."""
  title_not_contains: String

  """All values starting with the given string."""
  title_starts_with: String

  """All values not starting with the given string."""
  title_not_starts_with: String

  """All values ending with the given string."""
  title_ends_with: String

  """All values not ending with the given string."""
  title_not_ends_with: String
  content: String

  """All values that are not equal to given value."""
  content_not: String

  """All values that are contained in given list."""
  content_in: [String!]

  """All values that are not contained in given list."""
  content_not_in: [String!]

  """All values less than the given value."""
  content_lt: String

  """All values less than or equal the given value."""
  content_lte: String

  """All values greater than the given value."""
  content_gt: String

  """All values greater than or equal the given value."""
  content_gte: String

  """All values containing the given string."""
  content_contains: String

  """All values not containing the given string."""
  content_not_contains: String

  """All values starting with the given string."""
  content_starts_with: String

  """All values not starting with the given string."""
  content_not_starts_with: String

  """All values ending with the given string."""
  content_ends_with: String

  """All values not ending with the given string."""
  content_not_ends_with: String
  published: Boolean

  """All values that are not equal to given value."""
  published_not: Boolean
  author: UserWhereInput
  categories_every: CategoryWhereInput
  categories_some: CategoryWhereInput
  categories_none: CategoryWhereInput
}

input PostWhereUniqueInput {
  id: ID
}

type Profile implements Node {
  id: ID!
  bio: String
  user: User!
}

input ProfileCreateOneWithoutUserInput {
  create: ProfileCreateWithoutUserInput
  connect: ProfileWhereUniqueInput
}

input ProfileCreateWithoutUserInput {
  id: ID
  bio: String
}

input ProfileWhereInput {
  """Logical AND on all given filters."""
  AND: [ProfileWhereInput!]

  """Logical OR on all given filters."""
  OR: [ProfileWhereInput!]

  """Logical NOT on all given filters combined by AND."""
  NOT: [ProfileWhereInput!]
  id: ID

  """All values that are not equal to given value."""
  id_not: ID

  """All values that are contained in given list."""
  id_in: [ID!]

  """All values that are not contained in given list."""
  id_not_in: [ID!]

  """All values less than the given value."""
  id_lt: ID

  """All values less than or equal the given value."""
  id_lte: ID

  """All values greater than the given value."""
  id_gt: ID

  """All values greater than or equal the given value."""
  id_gte: ID

  """All values containing the given string."""
  id_contains: ID

  """All values not containing the given string."""
  id_not_contains: ID

  """All values starting with the given string."""
  id_starts_with: ID

  """All values not starting with the given string."""
  id_not_starts_with: ID

  """All values ending with the given string."""
  id_ends_with: ID

  """All values not ending with the given string."""
  id_not_ends_with: ID
  bio: String

  """All values that are not equal to given value."""
  bio_not: String

  """All values that are contained in given list."""
  bio_in: [String!]

  """All values that are not contained in given list."""
  bio_not_in: [String!]

  """All values less than the given value."""
  bio_lt: String

  """All values less than or equal the given value."""
  bio_lte: String

  """All values greater than the given value."""
  bio_gt: String

  """All values greater than or equal the given value."""
  bio_gte: String

  """All values containing the given string."""
  bio_contains: String

  """All values not containing the given string."""
  bio_not_contains: String

  """All values starting with the given string."""
  bio_starts_with: String

  """All values not starting with the given string."""
  bio_not_starts_with: String

  """All values ending with the given string."""
  bio_ends_with: String

  """All values not ending with the given string."""
  bio_not_ends_with: String
  user: UserWhereInput
}

input ProfileWhereUniqueInput {
  id: ID
}

enum Role {
  ADMIN
  CUSTOMER
}

type User implements Node {
  id: ID!
  email: String
  name: String!
  posts(where: PostWhereInput, orderBy: Enumerable<PostOrderByInput>, skip: Int, after: String, before: String, first: Int, last: Int): [Post!]
  role: Role!
  profile: Profile
  jsonData: Json
}

input UserCreateInput {
  id: ID
  email: String
  name: String!
  role: Role
  jsonData: Json
  posts: PostCreateManyWithoutAuthorInput
  profile: ProfileCreateOneWithoutUserInput
}

enum UserOrderByInput {
  id_ASC
  id_DESC
  email_ASC
  email_DESC
  name_ASC
  name_DESC
  role_ASC
  role_DESC
  jsonData_ASC
  jsonData_DESC
}

input UserWhereInput {
  """Logical AND on all given filters."""
  AND: [UserWhereInput!]

  """Logical OR on all given filters."""
  OR: [UserWhereInput!]

  """Logical NOT on all given filters combined by AND."""
  NOT: [UserWhereInput!]
  id: ID

  """All values that are not equal to given value."""
  id_not: ID

  """All values that are contained in given list."""
  id_in: [ID!]

  """All values that are not contained in given list."""
  id_not_in: [ID!]

  """All values less than the given value."""
  id_lt: ID

  """All values less than or equal the given value."""
  id_lte: ID

  """All values greater than the given value."""
  id_gt: ID

  """All values greater than or equal the given value."""
  id_gte: ID

  """All values containing the given string."""
  id_contains: ID

  """All values not containing the given string."""
  id_not_contains: ID

  """All values starting with the given string."""
  id_starts_with: ID

  """All values not starting with the given string."""
  id_not_starts_with: ID

  """All values ending with the given string."""
  id_ends_with: ID

  """All values not ending with the given string."""
  id_not_ends_with: ID
  email: String

  """All values that are not equal to given value."""
  email_not: String

  """All values that are contained in given list."""
  email_in: [String!]

  """All values that are not contained in given list."""
  email_not_in: [String!]

  """All values less than the given value."""
  email_lt: String

  """All values less than or equal the given value."""
  email_lte: String

  """All values greater than the given value."""
  email_gt: String

  """All values greater than or equal the given value."""
  email_gte: String

  """All values containing the given string."""
  email_contains: String

  """All values not containing the given string."""
  email_not_contains: String

  """All values starting with the given string."""
  email_starts_with: String

  """All values not starting with the given string."""
  email_not_starts_with: String

  """All values ending with the given string."""
  email_ends_with: String

  """All values not ending with the given string."""
  email_not_ends_with: String
  name: String

  """All values that are not equal to given value."""
  name_not: String

  """All values that are contained in given list."""
  name_in: [String!]

  """All values that are not contained in given list."""
  name_not_in: [String!]

  """All values less than the given value."""
  name_lt: String

  """All values less than or equal the given value."""
  name_lte: String

  """All values greater than the given value."""
  name_gt: String

  """All values greater than or equal the given value."""
  name_gte: String

  """All values containing the given string."""
  name_contains: String

  """All values not containing the given string."""
  name_not_contains: String

  """All values starting with the given string."""
  name_starts_with: String

  """All values not starting with the given string."""
  name_not_starts_with: String

  """All values ending with the given string."""
  name_ends_with: String

  """All values not ending with the given string."""
  name_not_ends_with: String
  role: Role

  """All values that are not equal to given value."""
  role_not: Role

  """All values that are contained in given list."""
  role_in: [Role!]

  """All values that are not contained in given list."""
  role_not_in: [Role!]
  posts_every: PostWhereInput
  posts_some: PostWhereInput
  posts_none: PostWhereInput
  profile: ProfileWhereInput
}
你會注意到,新版本的 GraphQL schema 不僅定義了直接匯入的 模型,還定義了之前 schema 中不存在的額外型別(例如 input 型別)。
2. 設定你的 PrismaClient 例項
PrismaClient 是 Prisma ORM 2 中你與資料庫的新介面。它允許你呼叫各種方法來構建 SQL 查詢並將它們傳送到資料庫,將結果作為普通 JavaScript 物件返回。
PrismaClient 查詢 API 的靈感來源於最初的 prisma-binding API,因此你使用 Prisma Client 傳送的許多查詢都會感到熟悉。
與 Prisma 1 中的 prisma-binding 例項類似,你也會希望將 Prisma ORM 2 中的 PrismaClient 附加到 GraphQL 的 context 上,以便在你的解析器中訪問它。
const { PrismaClient } = require('@prisma/client')

// ...

const server = new GraphQLServer({
  typeDefs: 'src/schema.graphql',
  resolvers,
  context: (req) => ({
    ...req,
    prisma: new Prisma({
      typeDefs: 'src/generated/prisma.graphql',
      endpoint: 'https://:4466',
    }),
    prisma: new PrismaClient(),
  }),
})
在上面的程式碼塊中,紅色 行是你當前設定中要刪除的行,綠色 行是你應該新增的行。當然,你的舊設定可能與此不同(例如,如果你在生產環境中執行 API,你的 Prisma ORM endpoint 不太可能是 https://:4466),這只是一個示例,以說明它可能的樣子。
當你現在在解析器中訪問 context.prisma 時,你現在可以訪問 Prisma Client 查詢了。
2. 編寫你的 GraphQL 型別解析器
prisma-binding 能夠神奇地解析你的 GraphQL schema 中的關係。然而,當不使用 prisma-binding 時,你需要使用所謂的 型別解析器(type resolvers) 明確解析你的關係。
注意 你可以在這篇文章中瞭解更多關於型別解析器(type resolvers)的概念以及為什麼它們是必要的:GraphQL Server Basics: GraphQL Schemas, TypeDefs & Resolvers Explained
2.1. 為 User 型別實現型別解析器
我們示例 GraphQL schema 中的 User 型別定義如下
type User implements Node {
  id: ID!
  email: String
  name: String!
  posts(
    where: PostWhereInput
    orderBy: Enumerable<PostOrderByInput>
    skip: Int
    after: String
    before: String
    first: Int
    last: Int
  ): [Post!]
  role: Role!
  profile: Profile
  jsonData: Json
}
此型別有兩個關係
posts欄位表示與Post的一對多關係profile欄位表示與Profile的一對一關係
由於你不再使用 prisma-binding,現在需要在型別解析器中“手動”解析這些關係。
你可以透過向你的 解析器對映(resolver map) 新增一個 User 欄位,並按如下方式實現 posts 和 profile 關係的解析器。
const resolvers = {
  Query: {
    // ... your query resolvers
  },
  Mutation: {
    // ... your mutation resolvers
  },
  User: {
    posts: (parent, args, context) => {
      return context.prisma.user
        .findUnique({
          where: { id: parent.id },
        })
        .posts()
    },
    profile: (parent, args, context) => {
      return context.prisma.user
        .findUnique({
          where: { id: parent.id },
        })
        .profile()
    },
  },
}
在這些解析器中,你正在使用新的 PrismaClient 對資料庫執行查詢。在 posts 解析器中,資料庫查詢從指定的 author(其 id 包含在 parent 物件中)載入所有 Post 記錄。在 profile 解析器中,資料庫查詢從指定的 user(其 id 包含在 parent 物件中)載入 Profile 記錄。
由於這些額外的解析器,現在當你進行查詢以請求 User 型別資訊時,你將能夠巢狀 GraphQL 查詢/突變中的關係,例如:
{
  users {
    id
    name
    posts {
      # fetching this relation is enabled by the new type resolver
      id
      title
    }
    profile {
      # fetching this relation is enabled by the new type resolver
      id
      bio
    }
  }
}
2.2. 為 Post 型別實現型別解析器
我們示例 GraphQL schema 中的 Post 型別定義如下
type Post implements Node {
  id: ID!
  createdAt: DateTime!
  updatedAt: DateTime!
  title: String!
  content: String
  published: Boolean!
  author: User
  categories(
    where: CategoryWhereInput
    orderBy: Enumerable<CategoryOrderByInput>
    skip: Int
    after: String
    before: String
    first: Int
    last: Int
  ): [Category!]
}
此型別有兩個關係
author欄位表示與User的一對多關係categories欄位表示與Category的多對多關係
由於你不再使用 prisma-binding,現在需要在型別解析器中“手動”解析這些關係。
你可以透過向你的 解析器對映(resolver map) 新增一個 Post 欄位,並按如下方式實現 author 和 categories 關係的解析器。
const resolvers = {
  Query: {
    // ... your query resolvers
  },
  Mutation: {
    // ... your mutation resolvers
  },
  User: {
    // ... your type resolvers for `User` from before
  },
  Post: {
    author: (parent, args, context) => {
      return context.prisma.post
        .findUnique({
          where: { id: parent.id },
        })
        .author()
    },
    categories: (parent, args, context) => {
      return context.prisma.post
        .findUnique({
          where: { id: parent.id },
        })
        .categories()
    },
  },
}
在這些解析器中,你正在使用新的 PrismaClient 對資料庫執行查詢。在 author 解析器中,資料庫查詢載入表示 Post 的 author 的 User 記錄。在 categories 解析器中,資料庫查詢從指定的 post(其 id 包含在 parent 物件中)載入所有 Category 記錄。
由於這些額外的解析器,現在當你進行查詢以請求 User 型別資訊時,你將能夠巢狀 GraphQL 查詢/突變中的關係,例如:
{
  posts {
    id
    title
    author {
      # fetching this relation is enabled by the new type resolver
      id
      name
    }
    categories {
      # fetching this relation is enabled by the new type resolver
      id
      name
    }
  }
}
2.3. 為 Profile 型別實現型別解析器
我們示例 GraphQL schema 中的 Profile 型別定義如下
type Profile implements Node {
  id: ID!
  bio: String
  user: User!
}
此型別有一個關係:user 欄位表示與 User 的一對多關係。
由於你不再使用 prisma-binding,現在需要在型別解析器中“手動”解析此關係。
你可以透過向你的 解析器對映(resolver map) 新增一個 Profile 欄位,並按如下方式實現 owner 關係的解析器。
const resolvers = {
  Query: {
    // ... your query resolvers
  },
  Mutation: {
    // ... your mutation resolvers
  },
  User: {
    // ... your type resolvers for `User` from before
  },
  Post: {
    // ... your type resolvers for `Post` from before
  },
  Profile: {
    user: (parent, args, context) => {
      return context.prisma.profile
        .findUnique({
          where: { id: parent.id },
        })
        .owner()
    },
  },
}
在此解析器中,你正在使用新的 PrismaClient 對資料庫執行查詢。在 user 解析器中,資料庫查詢從指定的 profile(其 id 包含在 parent 物件中)載入 User 記錄。
由於這個額外的解析器,現在當你進行查詢以請求 Profile 型別資訊時,你將能夠巢狀 GraphQL 查詢/突變中的關係。
2.4. 為 Category 型別實現型別解析器
我們示例 GraphQL schema 中的 Category 型別定義如下
type Category implements Node {
  id: ID!
  name: String!
  posts(
    where: PostWhereInput
    orderBy: Enumerable<PostOrderByInput>
    skip: Int
    after: String
    before: String
    first: Int
    last: Int
  ): [Post!]
}
此型別有一個關係:posts 欄位表示與 Post 的多對多關係。
由於你不再使用 prisma-binding,現在需要在型別解析器中“手動”解析此關係。
你可以透過向你的 解析器對映(resolver map) 新增一個 Category 欄位,並按如下方式實現 posts 和 profile 關係的解析器。
const resolvers = {
  Query: {
    // ... your query resolvers
  },
  Mutation: {
    // ... your mutation resolvers
  },
  User: {
    // ... your type resolvers for `User` from before
  },
  Post: {
    // ... your type resolvers for `Post` from before
  },
  Profile: {
    // ... your type resolvers for `User` from before
  },
  Category: {
    posts: (parent, args, context) => {
      return context.prisma
        .findUnique({
          where: { id: parent.id },
        })
        .posts()
    },
  },
}
在此解析器中,你正在使用新的 PrismaClient 對資料庫執行查詢。在 posts 解析器中,資料庫查詢從指定的 categories(其 id 包含在 parent 物件中)載入所有 Post 記錄。
由於這個額外的解析器,現在當你進行查詢以請求 Category 型別資訊時,你將能夠巢狀 GraphQL 查詢/突變中的關係。
所有型別解析器就緒後,你可以開始遷移實際的 GraphQL API 操作。
3. 遷移 GraphQL 操作
3.1. 遷移 GraphQL 查詢
在本節中,你將把所有 GraphQL 查詢 從 prisma-binding 遷移到 Prisma Client。
3.1.1. 遷移 users 查詢(使用 forwardTo)
在我們的示例 API 中,示例 GraphQL schema 中的 users 查詢定義和實現如下。
使用 prisma-binding 的 SDL schema 定義
type Query {
  users(where: UserWhereInput, orderBy: Enumerable<UserOrderByInput>, skip: Int, after: String, before: String, first: Int, last: Int): [User]!
  # ... other queries
}
使用 prisma-binding 的解析器實現
const resolvers = {
  Query: {
    users: forwardTo('prisma'),
    // ... other resolvers
  },
}
使用 Prisma Client 實現 users 解析器
要重新實現以前使用 forwardTo 的查詢,思路是將傳入的過濾、排序和分頁引數傳遞給 PrismaClient。
const resolvers = {
  Query: {
    users: (_, args, context, info) => {
      // this doesn't work yet
      const { where, orderBy, skip, first, last, after, before } = args
      return context.prisma.user.findMany({
        where,
        orderBy,
        skip,
        first,
        last,
        after,
        before,
      })
    },
    // ... other resolvers
  },
}
請注意,這種方法目前尚不可行,因為傳入引數的結構與 PrismaClient 期望的不同。為確保結構相容,你可以使用 @prisma/binding-argument-transform npm 包來確保相容性。
npm install @prisma/binding-argument-transform
你現在可以按如下方式使用此包
const {
  makeOrderByPrisma2Compatible,
  makeWherePrisma2Compatible,
} = require('@prisma/binding-argument-transform')

const resolvers = {
  Query: {
    users: (_, args, context, info) => {
      // this still doesn't entirely work
      const { where, orderBy, skip, first, last, after, before } = args
      const prisma2Where = makeWherePrisma2Compatible(where)
      const prisma2OrderBy = makeOrderByPrisma2Compatible(orderBy)
      return context.prisma.user.findMany({
        where: prisma2Where,
        orderBy: prisma2OrderBy,
        skip,
        first,
        last,
        after,
        before,
      })
    },
    // ... other resolvers
  },
}
最後一個遺留問題是分頁引數。Prisma ORM 2 引入了 新的分頁 API
first,last,before和after引數已被移除- 新的
cursor引數取代了before和after - 新的
take引數取代了first和last
你可以按如下方式調整呼叫,使其符合新的 Prisma Client 分頁 API
const {
  makeOrderByPrisma2Compatible,
  makeWherePrisma2Compatible,
} = require('@prisma/binding-argument-transform')

const resolvers = {
  Query: {
    users: (_, args, context) => {
      const { where, orderBy, skip, first, last, after, before } = args
      const prisma2Where = makeWherePrisma2Compatible(where)
      const prisma2OrderBy = makeOrderByPrisma2Compatible(orderBy)
      const skipValue = skip || 0
      const prisma2Skip = Boolean(before) ? skipValue + 1 : skipValue
      const prisma2Take = Boolean(last) ? -last : first
      const prisma2Before = { id: before }
      const prisma2After = { id: after }
      const prisma2Cursor =
        !Boolean(before) && !Boolean(after)
          ? undefined
          : Boolean(before)
          ? prisma2Before
          : prisma2After
      return context.prisma.user.findMany({
        where: prisma2Where,
        orderBy: prisma2OrderBy,
        skip: prisma2Skip,
        cursor: prisma2Cursor,
        take: prisma2Take,
      })
    },
    // ... other resolvers
  },
}
這些計算是為了確保傳入的分頁引數能正確對映到 Prisma Client API 中的引數。
3.1.2. 遷移 posts(searchString: String): [Post!]! 查詢
posts 查詢定義和實現如下。
使用 prisma-binding 的 SDL schema 定義
type Query {
  posts(searchString: String): [Post!]!
  # ... other queries
}
使用 prisma-binding 的解析器實現
const resolvers = {
  Query: {
    posts: (_, args, context, info) => {
      return context.prisma.query.posts(
        {
          where: {
            OR: [
              { title_contains: args.searchString },
              { content_contains: args.searchString },
            ],
          },
        },
        info
      )
    },
    // ... other resolvers
  },
}
使用 Prisma Client 實現 posts 解析器
為了在新版 Prisma Client 中獲得相同的行為,你需要調整你的解析器實現。
const resolvers = {
  Query: {
    posts: (_, args, context) => {
      return context.prisma.post.findMany({
        where: {
          OR: [
            { title: { contains: args.searchString } },
            { content: { contains: args.searchString } },
          ],
        },
      })
    },
    // ... other resolvers
  },
}
你現在可以在 GraphQL Playground 中傳送相應的查詢。
{
  posts {
    id
    title
    author {
      id
      name
    }
  }
}
3.1.3. 遷移 user(uniqueInput: UserUniqueInput): User 查詢
在我們的示例應用中,user 查詢定義和實現如下。
使用 prisma-binding 的 SDL schema 定義
type Query {
  user(userUniqueInput: UserUniqueInput): User
  # ... other queries
}

input UserUniqueInput {
  id: String
  email: String
}
使用 prisma-binding 的解析器實現
const resolvers = {
  Query: {
    user: (_, args, context, info) => {
      return context.prisma.query.user(
        {
          where: args.userUniqueInput,
        },
        info
      )
    },
    // ... other resolvers
  },
}
使用 Prisma Client 實現 user 解析器
為了在新版 Prisma Client 中獲得相同的行為,你需要調整你的解析器實現。
const resolvers = {
  Query: {
    user: (_, args, context) => {
      return context.prisma.user.findUnique({
        where: args.userUniqueInput,
      })
    },
    // ... other resolvers
  },
}
你現在可以透過 GraphQL Playground 傳送相應的查詢。
{
  user(userUniqueInput: { email: "alice@prisma.io" }) {
    id
    name
  }
}
3.1. 遷移 GraphQL 突變
在本節中,你將從示例 schema 遷移 GraphQL 突變。
3.1.2. 遷移 createUser 突變(使用 forwardTo)
在示例應用中,示例 GraphQL schema 中的 createUser 突變定義和實現如下。
使用 prisma-binding 的 SDL schema 定義
type Mutation {
  createUser(data: UserCreateInput!): User!
  # ... other mutations
}
使用 prisma-binding 的解析器實現
const resolvers = {
  Mutation: {
    createUser: forwardTo('prisma'),
    // ... other resolvers
  },
}
使用 Prisma Client 實現 createUser 解析器
為了在新版 Prisma Client 中獲得相同的行為,你需要調整你的解析器實現。
const resolvers = {
  Mutation: {
    createUser: (_, args, context, info) => {
      return context.prisma.user.create({
        data: args.data,
      })
    },
    // ... other resolvers
  },
}
你現在可以針對新 API 編寫你的第一個突變,例如:
mutation {
  createUser(data: { name: "Alice", email: "alice@prisma.io" }) {
    id
  }
}
3.1.3. 遷移 createDraft(title: String!, content: String, authorId: String!): Post! 查詢
在示例應用中,createDraft 突變定義和實現如下。
使用 prisma-binding 的 SDL schema 定義
type Mutation {
  createDraft(title: String!, content: String, authorId: String!): Post!
  # ... other mutations
}
使用 prisma-binding 的解析器實現
const resolvers = {
  Mutation: {
    createDraft: (_, args, context, info) => {
      return context.prisma.mutation.createPost(
        {
          data: {
            title: args.title,
            content: args.content,
            author: {
              connect: {
                id: args.authorId,
              },
            },
          },
        },
        info
      )
    },
    // ... other resolvers
  },
}
使用 Prisma Client 實現 createDraft 解析器
為了在新版 Prisma Client 中獲得相同的行為,你需要調整你的解析器實現。
const resolvers = {
  Mutation: {
    createDraft: (_, args, context, info) => {
      return context.prisma.post.create({
        data: {
          title: args.title,
          content: args.content,
          author: {
            connect: {
              id: args.authorId,
            },
          },
        },
      })
    },
    // ... other resolvers
  },
}
你現在可以透過 GraphQL Playground 傳送相應的突變。
mutation {
  createDraft(title: "Hello World", authorId: "__AUTHOR_ID__") {
    id
    published
    author {
      id
      name
    }
  }
}
3.1.4. 遷移 updateBio(bio: String, userUniqueInput: UserUniqueInput!): User 突變
在示例應用中,updateBio 突變定義和實現如下。
使用 prisma-binding 的 SDL schema 定義
type Mutation {
  updateBio(bio: String!, userUniqueInput: UserUniqueInput!): User
  # ... other mutations
}
使用 prisma-binding 的解析器實現
const resolvers = {
  Mutation: {
    updateBio: (_, args, context, info) => {
      return context.prisma.mutation.updateUser(
        {
          data: {
            profile: {
              update: { bio: args.bio },
            },
          },
          where: { id: args.userId },
        },
        info
      )
    },
    // ... other resolvers
  },
}
使用 Prisma Client 實現 updateBio 解析器
為了在 Prisma Client 中獲得相同的行為,你需要調整你的解析器實現。
const resolvers = {
  Mutation: {
    updateBio: (_, args, context, info) => {
      return context.prisma.user.update({
        data: {
          profile: {
            update: { bio: args.bio },
          },
        },
        where: args.userUniqueInput,
      })
    },
    // ... other resolvers
  },
}
你現在可以透過 GraphQL Playground 傳送相應的突變。
mutation {
  updateBio(
    userUniqueInput: { email: "alice@prisma.io" }
    bio: "I like turtles"
  ) {
    id
    name
    profile {
      id
      bio
    }
  }
}
3.1.5. 遷移 addPostToCategories(postId: String!, categoryIds: [String!]!): Post 突變
在我們的示例應用中,addPostToCategories 突變定義和實現如下。
使用 prisma-binding 的 SDL schema 定義
type Mutation {
  addPostToCategories(postId: String!, categoryIds: [String!]!): Post
  # ... other mutations
}
使用 prisma-binding 的解析器實現
const resolvers = {
  Mutation: {
    addPostToCategories: (_, args, context, info) => {
      const ids = args.categoryIds.map((id) => ({ id }))
      return context.prisma.mutation.updatePost(
        {
          data: {
            categories: {
              connect: ids,
            },
          },
          where: {
            id: args.postId,
          },
        },
        info
      )
    },
    // ... other resolvers
  },
}
使用 Prisma Client 實現 addPostToCategories 解析器
為了在 Prisma Client 中獲得相同的行為,你需要調整你的解析器實現。
const resolvers = {
  Mutation: {
    addPostToCategories: (_, args, context, info) => {
      const ids = args.categoryIds.map((id) => ({ id }))
      return context.prisma.post.update({
        where: {
          id: args.postId,
        },
        data: {
          categories: { connect: ids },
        },
      })
    },
    // ... other resolvers
  },
}
你現在可以透過 GraphQL Playground 傳送相應的查詢。
mutation {
  addPostToCategories(
    postId: "__AUTHOR_ID__"
    categoryIds: ["__CATEGORY_ID_1__", "__CATEGORY_ID_2__"]
  ) {
    id
    title
    categories {
      id
      name
    }
  }
}
4. 清理
由於整個應用現在已升級到 Prisma ORM 2,你可以刪除所有不必要的檔案並移除不再需要的依賴項。
4.1. 清理 npm 依賴項
你可以從移除與 Prisma 1 設定相關的 npm 依賴項開始。
npm uninstall graphql-cli prisma-binding prisma1
4.2. 刪除未使用的檔案
接下來,刪除你的 Prisma 1 設定檔案。
rm prisma1/datamodel.prisma prisma1/prisma.yml
4.3. 停止 Prisma ORM 伺服器
最後,你可以停止執行你的 Prisma ORM 伺服器。